The Best Calisthenics Back Workout Routine
6 Best Bodyweight Exercises For Back Strength And Muscle Growth

If you’re looking for a really good calisthenics back workout routine that will strengthen your back and give you the coveted V-taper look, then you’ve stumbled upon the right page.
In the following paragraphs, I’m going to share with you one of my favorite back workout routines that I’ve been doing several times per week for years now.
The routine as presented below is not identical to what I do every single time. It’s simply one version of the workout. This is because if fitness becomes a way of life for you and you do it for a very long time, then it’s inevitable that you will explore variations of routines and exercises.
However, the tried-and-true movements will always be a staple in any seasoned veteran’s toolbox.
And that is exactly what this back workout routine is based on — the bread-and-butter back strengthening exercises that have been proven to work.
It consists of a combination of isotonic (reps and sets) exercises and isometric (static hold) exercises that will target both your upper back and lower back.
Finally, before we begin, it’s important to note that this routine is primarily aimed at those who are able to do a minimum of 8 pull-ups in one set. If that doesn’t describe you, don’t worry!
There are modified versions of it that I’ve used successfully with some of my clients and that I’d be more than happy to write a separate article about. Let me know if you’re interested, and if enough people request it in the comments, then I will share it.

Warmup Exercise | The Superman Position
The superman exercise is an excellent way to fire up your posterior chain (the muscles on the back-side of your body).
Begin as you see in the bottom image above, with your face down, arms stretched out in front of you, and feet together with toes pointed.
When you’re ready, attempt to transform your body into a “U” shape by lifting your chest, arms, and legs off of the ground. Visualize your belly button as being the bottom-center of the “U”.
Once you reach “peak U”, where you cannot physically elevate any higher on either end of your body, pause and stay there for 2 or 3 seconds. Then lower everything back down slowly until you’re back in the starting position. Try to time your breathing so you inhale on the up and exhale on the down.
How Many Supermans Should I Do?
Remember that this is a warmup exercise so we’re going to keep it light.
Perform 3 sets of 12 reps with a 1 minute rest between sets.
Then perform a fourth and final set, but change from reps to a pure static hold. Try to aim for 1 full minute if you can. You don’t need to go past 1 minute. If you are unable to make it to a full minute then simply do it for as long as you can and move on to the next segment of the workout.
Depending on how you feel, this could mean either jumping right into the first exercise below, or adding some light mobility work first. As a suggestion, two of my personal favorite upper body mobility warmup moves are shoulder rotations and wrist rotations.
They are not complicated.
It simply involves making circular motions at the shoulder joints and at the wrists and occasionally switching the direction of the circle from clockwise to counter-clockwise.
When you are ready, you can begin the calisthenics back workout routine, starting with the first exercise below.

First Exercise | Classic Pull-Up
How Many Pull-Ups Should I Do?
For this particular calisthenics back workout routine, you are going to perform 50 repetitions. They will be broken up into 10 sets of 5 pull-ups per set.
Before we get to the fine details though, let us review how to properly perform a pull-up.
How To Do a Pull-Up Correctly
First, take a classic pronated (overhand) grip on the pull-up bar. Don’t go unnecessarily wide or narrow. A bit wider than shoulder width works fine.
If the height of the pull-up bar allows for it, allow your legs to fully extend out in front of you, with feet together and toes pointed. If you are too close to the ground, then shorten the length of your legs by bending back at the knee (as if trying to touch your butt with your feet).
Try to avoid doing a bodybuilder style position with your legs crossed behind you. You goal is to simply shorten the length of your legs in the cleanest way possible. So keep your legs together still, and only bend back at the knee to allow you to hang.
Brace your core.
Engage your scapulae (shoulder blades).
The best way to think about engaging your scapulae is to contrast it with the dead hang position.
If you are in a dead hang position on the pull-up bar, then the insides of your shoulders should be making contact with your ears. When you activate the scapulae and perform a scapular depression, your body will elevate slightly and your shoulders will move away from your ears until you’re no longer making direct ear contact. The key is to not bend your elbows at all. The entire elevation happens because of the scapular depression.
Take a look at the photograph of me demonstrating it below so you get a better idea of what it’s supposed to look like.

To recap the above on how to do a pull-up correctly:
a) Grab the pull-up bar, slightly more than shoulder width apart.
b) If possible, allow your legs to extend fully down, with feet together and toes pointed.
c) Brace your core.
d) Activate your shoulder blades (scapulae) as demonstrated in the image above.
e) Pull your body up so that your chin clears (goes above) the pull-up bar without straining your neck. In other words, your chin is clearing the bar because your back and your arms are getting you there, not because you are trying to giraffe your neck over.
(In case you’re wondering, the answer is yes, I did just turn the word giraffe into a verb.)
f) Lower yourself back down in a controlled manner. In other words, don’t free-fall back down. You can choose to either go back down into a full dead hang position before starting the next rep, or into the scapulae locked position. The key is that your elbows will be fully extended and locked out at the bottom part of the rep. Note that if you choose the scapulae locked option, that you will fatigue faster than if you go back into a dead hang.
Now that we have that out of the way, let’s get to the execution of the first part of this back workout routine.
How To Do The 50 Pull-Ups
It’s pretty simple actually. You will do 5 pull-ups and then rest 1 minute. You will then repeat this for 10 sets until you’ve completed 50 pull-ups.
You can either use the regular stopwatch feature on your phone or you can download an app like GymBoss and set up 2 intervals — one for 1 minute, and the other for 10 seconds. That will give you roughly 2 seconds to perform each pull-up. You can increase the working interval to 15 seconds if that works better for you and helps you maintain proper pull-up form.
This may seem easy for the first few sets but as the sets go on, it will continue to get more difficult.
What If I Start Losing Pace?
Depending on how strong you are at the moment, this routine could either feel too easy or too difficult. If you fall into the latter camp and you find yourself unable to keep pace with the 1 minute rest time, then simply take a slightly longer rest before doing your next set of 5 reps.
Don’t cheat yourself though. If you need an extra 30 seconds then take the extra 30, but don’t stretch it into 90. Take the minimum extra that you need before starting the next set of 5.
You can also break up the 5 reps by doing 3 pull-ups, briefly getting off of the pull-up bar, taking a few deep breaths, and then hopping back on to complete the 2 remaining reps.
Ultimately, the goal is to complete the 50 pull-ups, so if you need to tweak it here and there to reach that goal, then do what you need to do.
What If It’s Too Easy
If you’re already a beast on the bars, then do the routine but throw on a weight-vest. You can also use ankle weights, a belt that allows you to add additional weight, or even hold a dumbbell between your feet.
I do advise some caution here in terms of the additional weight. Keep in mind that these 50 pull-ups are only the first exercise in this calisthenics back workout routine. This means that you’ll want to choose a weight that will challenge you, but not something so heavy that your gas tank will be close to empty by the time you finish.

Second Exercise | Close Grip Chin-Up
How Many Chin-Ups Should I Do?
Believe it or not, you will only do 20 chin-ups for this portion of the calisthenics back workout. There’s plenty more after this though, so don’t be too concerned.
How To Do A Close Grip Chin-Up Correctly
I’m not going to go as heavy into detail with proper chin-up technique because it’s very similar to the proper pull-up technique we discussed earlier.
Follow all the same points from that section, but note the following differences:
The first is that the close grip chin-up position will make it a little easier to maintain a nice, tight hollow-body with core braced, feet together, and toes pointed. This is because it naturally tilts your feet forward in front of you, which puts your body into that comma looking shape that you want to be in. In other words, your body will gently nudge you into place if you just listen to it.
Second, your hands will obviously be positioned differently from the pull-up position. You will place them next to each other on the bar, with palms facing inward (supinated). The edges of your pinkies don’t absolutely have to make skin contact if you find it uncomfortable, but if you do create a wedge of separation, make sure it’s very minimal.
This hand position may also cause readers who are well-versed in kinesiology to jump on me about including this exercise in the routine, given the title and premise of the article. That’s because close grip chin-ups place a lot more emphasis on your biceps than other pull-up variations. In other words, I could have technically picked a different pull-up variation that targets the back more, but don’t get it twisted — your back will still be working!
Third, pay particular attention to your elbows. Try to visualize your elbows moving down and back as you pull yourself towards the pull-up bar.
This is in contrast to focusing on your arms.
Your arms will be working. Don’t worry about them.
Concentrate on initiating the movement and follow through from the elbows, until your chin clears the bar. Then lower yourself back down in a controlled fashion.
How To Do The 20 Chin-Ups
You will continue with the same set up from before. Perform 5 chin-ups, rest 1 minute, and repeat 4 times.

Third Exercise | Mixed Grip Pull-Up
How Many Mixed Grip Pull-Ups Should I Do?
If you’ve been keeping count up until now, your total reps at this point should be 70. That means you have 30 more to go to reach 100.
These mixed grip pull-ups will be your 30. You will complete 15 facing your hands one way, and the other 15 facing your hands the opposite way.
You’ll end up doing 6 total sets, alternating the mixed grip every other set.
For example, if you start with your right hand facing in and your left hand facing out, then on your next set, you would make your right hand face out and your left hand face in.
Just as before, try to stick to 1 minute between sets until you’ve completed all 30 pull-ups.
What Are The Benefits Of Mixed Grip Pull-Ups?
One of the aspects of this exercise that I love is that you can very easily choose to have one of your arms take on a greater percentage of the work being done.
The way to do this, is to designate one of your arms as the dominant side and focus on pulling with mostly that arm. The other arm will act as the “helper”. This helps build unilateral strength and serves as an early stepping stone towards working on unlocking the one arm pull-up.
You can break it up by looking at the 6 sets as 3 sets of pairs — since you’ll be switching the grip on alternating sets.
So for the first pair, you can make your right side the dominant arm.
The second pair make your left side the dominant arm.
Finally, for the third pair, do a normal, equal distribution among both arms.

Fourth Exercise | Pull-Up Static Holds
Do Static Holds Build Strength?
The answer is a resounding “yes”.
Static holds are the unsung hero when it comes to pull-up strength and endurance. Increasing total rep volume over time is important and effective, but don’t forget about the almighty King T.U.T. training variable.
King T.U.T. is, of course, a creative reference to time-under-tension, which is one of the key training variables you can manipulate to increase strength and stimulate hypertrophy (muscle growth).
Unlike reps, where tension is distributed throughout the range of motion of a given exercise, static holds pick a point on that range and apply tension for a set amount of time.
How To Train Static Holds To Strengthen Your Pull-Ups
For this part of the routine, you will perform 8 total sets, and you will alternate between two different static holds. The first will be chin-over-bar and the second will be top-of-the-head touching the bottom of the bar.
Take 1.5 to 2.5 minutes of rest between sets.
For the chin-over-bar variation, simply perform the first half of a pull-up (i.e. — the going up part) and once your chin clears the bar, just stay there.
Keep the core tight and the legs fully extended with toes pointed if the height of the pull-up bar allows for it.
Try your hardest to keep your chin from dropping below the bar and stay there for a minimum of 10 seconds, but aim for 30 seconds. Remember that you’ll be doing this after you’ve already performed 50 pull-ups, 20 close grip chin-ups and 30 mixed grip pull-ups, so 30 seconds might not seem like a lot, but your perspective might change as you progress through the 8 sets.
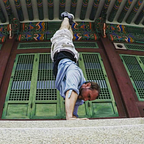
For the top-of-the-head touching the bottom of the bar variation, you’ll want to take a bit of a wider grip on the pull-up bar. This is because ideally, you’ll want your elbows bent at a 90 degree angle when you’ll be in the static hold.
For an example of what this is supposed to look like, take a brief reading intermission and scroll to the very top of the page. The main banner image is what you’ll be aiming for as far as technique goes.
In terms of time, the same rule applies. Aim for a minimum of 10 seconds but try to get 30 seconds if you can.
How To Adjust The Difficulty Of Static Holds
When you finish going through this whole routine the first time, it should give you an idea of how strong you feel by the time you get to this static hold stage.
If the holds feel really difficult and you can barely make it to 10 seconds on each round — that’s okay! Complete the routine anyway, and give it your best effort. Also, consider taking slightly longer rests between each set to give you a little more holding power. Above all, stay consistent and work your way through the routine at least twice a week. Over time you’ll get stronger and you’ll be hitting the 30 second mark for all 8 sets.
In contrast, if you are able to do that right from the very first time you attempt this routine, then the next time you do it, bump the goal number to 45–60 seconds.
It’s like chasing a rabbit. You always want it slightly ahead of you so that you have to fight to get to where it’s at. In the process, your body will adapt and you will unlock new levels of strength and endurance.

Fifth Exercise | The Back Bridge (Full Wheel Pose)
How To Do A Back Bridge
There are quite a few options for executing a back bridge, or full wheel pose as it’s known in yoga circles. If you have poor thoracic spine mobility or shoulder mobility like yours truly, then you’ll need to do a back bridge exercise progression rather than the full move.
One possible approach is demonstrated in the image below. As you can see, I used 2 yoga blocks to create angled platforms that I could place my hands on. The idea is that over time, my shoulder mobility will improve and I’ll be able to reduce the space between the yoga blocks and the floor.

The full expression of this hold would look similar to what you see above, but without the yoga blocks and with my palms flat on the ground.
Another approach would be to remove shoulder mobility from the exercise by replacing your hands as a touchpoint with the ground, and instead using the top of your head.
Not everyone is going to find this variation comfortable and it comes with a little bit of risk as well since there will be pressure placed on your neck to support some of your body weight. If you do it right, it can strengthen your neck over time, but I would not recommend this variation for beginners. Most people will be much better off using the yoga block method described earlier.
A third option, which also removes shoulder mobility from the equation, is to do a half-bridge by using a bench or something else to support a portion of your upper back.
For this, you’d simply rest a part of your upper back on the bench and lift your lower body up in the same way that you see in the images above. The key thing is to pick a bench that isn’t too tall or too short. You’ll want the bench to be about the same height as the length from the top of your knees down to the bottom of your feet.
This third back bridge progression is probably the most accessible because it is both mechanically easier, and doesn’t require yoga blocks to pull off. As long as you have a bench, a couch, or anything to rest your upper back against, then you can do it.
How To Set Up Timing Intervals For The Back Bridge
For all of the back bridge variations, aim for a 1.5 minute rest between sets.
If you are able to perform the full back bridge without the assistance of yoga blocks, then aim for 5 sets of 45–60 second holds.
If you need to use yoga blocks, then aim for 5 sets of 30 seconds.
If you plan on doing the half-bridge, with your upper back laying on a bench, then aim for 5 rounds of 60 seconds.
Finally, if you want to (cautiously) attempt the neck-bridge variation, I’d start with no more than 10–15 seconds per set for a total of 3 to 5 sets. To reiterate though, most people would be better off doing one of the other three above.

Final Thoughts
First, if you made it this far, I’d like to thank you for taking the time to read this. I hope you got some value out of it and that you attempt the routine yourself if it’s within your ability to do so.
Second, I always stress the great Bruce Lee’s philosophy, which is to take what is useful to you, and disregard the rest. If parts of this routine resonated with you, but other parts didn’t, then use the sections that were relevant to you and feel free to make adjustments according to your needs. Remember, I said it myself at the beginning of this article that I also do variations of what I wrote here. This doesn’t need to be followed exactly to the very last detail.
Finally — and this is irrespective of what style of exercise you choose to engage in — try to find a workout partner or an exercise community to join. It creates a built-in accountability factor that will help you stay on track on those days when you don’t feel like exercising.
Have fun with the routine and let me know if you have any questions. I’m always happy to share my two cents.
Yours in strength and in health,
Martin